Friday, July 19, 2024

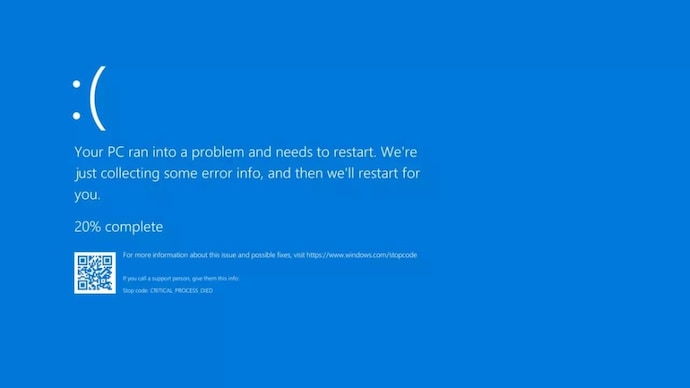
Blue Screen of Death appeared in Microsoft Windows - CrowdStrike Issue

 On 19th July 2024, a number of computers across the globe faces outage. Suddenly a 'Blue Screen of Death' appeared on computers running Windows 10. This doesn't affect few computers, but it affected some major companies like banks, airlines, restaurants, etc. 


On preliminary investigation, it was found that the problem occurred on Windows 10 computers which also running CrowdStrike as a cyber security software solution. 

A faulty update was published by CrowdStrike which causes this error. It crashes Windows 10 systems. Since the computers had crashed, it was not possible to automatically restore them through online / remote support. 

The solution suggested to recover this error, as suggested by CrowdStrike is as follows:

How to deal with the Blue Screen of Death.
  1. "Boot Windows into Safe Mode or the Windows Recovery Environment.
  2. "Navigate to the C:\Windows\System32\drivers\CrowdStrike directory.
  3. "Locate the file matching 'C-0000029*.sys', and delete it.
  4. "Boot the host normally."

Tuesday, March 21, 2023

Git for Beginners: A Step-by-Step Guide to Version Control

Git for Beginners: A Step-by-Step Guide to Version Control

Git is a powerful version control system that allows developers to track changes in their codebase. In this article, we'll guide you through the basic steps of using Git for beginners.

Step 1: Install Git

To get started with Git, you need to install it on your computer. You can download Git from the official website and follow the installation steps.

Step 2: Create a Git Repository

Once you have Git installed, you need to create a repository for your project. A repository is a place where Git stores all the changes made to your codebase. To create a repository, use the command "git init" in your project directory.

Step 3: Add Files to the Repository

After creating the repository, you need to add your project files to it. Use the command "git add ." to add all the files in the directory to the repository.

Step 4: Commit Changes

Once you have added the files to the repository, you need to commit the changes. A commit is a snapshot of your codebase at a specific point in time. Use the command "git commit -m 'commit message'" to commit your changes.

Step 5: Push Changes to a Remote Repository

If you're working with a team, you need to push your changes to a remote repository. Use the command "git push" to push your changes to a remote repository.

Step 6: Pull Changes from a Remote Repository

If your team members have made changes to the codebase, you need to pull those changes to your local repository. Use the command "git pull" to pull changes from a remote repository.

Step 7: Branching

Git allows you to create branches to work on different features or fixes without affecting the main codebase. Use the command "git branch" to create a new branch and "git checkout" to switch between branches.

In conclusion, Git is a powerful tool for version control that every developer should learn. By following these basic steps, you can get started with Git and explore more advanced features like merging, rebasing, and resolving conflicts. Happy coding!

Azure Development – The Future of Cloud Computing

As technological advancements continue to accelerate, Microsoft Azure has emerged as a top cloud computing platform. It offers a range of services that can be utilized for developing, testing, deploying, and managing applications on a global scale. With Azure, developers can focus on innovation instead of infrastructure, causing it to become the preferred option for software development today.

What is Azure Development?

Azure Development is a method of creating applications that utilize Microsoft’s Azure cloud platform. It is a set of practices and procedures that entails designing, developing, and deploying applications and services on the Azure cloud. The Azure platform offers a wide range of services, from computation to storage and analytics, enabling you to build and deploy applications with less overhead.

The Benefits of using Azure Development

Developing applications on Azure has several benefits, including its affordability, unbeatable scalability, and ease of deployment. Here are some other advantages of using Azure Development:

Faster development cycles

One of the main benefits of Azure Development is that it reduces the time to market for an application. Utilizing the extensive range of pre-built templates and tools for development, can enable developers to complete a project much quicker than previously possible.

Seamless integration

Azure Development is integrated with other Microsoft systems like Office 365, Power BI, and SharePoint, enabling developers to create a seamless workflow. This integration allows developers to share data across apps and assess relevant insights without the need to switch between applications.

Security

Azure offers reliable security systems to safeguard your data and applications. With built-in security features like Azure Active Directory (AD), you can manage access and permissions for your applications, data, and resources. Additionally, Azure's Compliance offerings provide tools that help you meet complex regulatory requirements.

Cost-effectiveness

With Azure Development, you can save on infrastructure and operational expenses. You don’t need to manage the hardware, and paying only for what you use ensures that you don't pay for any resources that go unused.

Flexibility

Azure Development enables you to build and deploy applications in any language or platform that suits your requirements. It supports various programming languages like .NET, Java, Python, and more. Additionally, Azure offers several options for running and managing applications, from Azure Virtual Machines to Azure Container Service.

Tools for Azure Development

Azure Development provides a range of developer tools to enhance your workflows and make your life easier. From tools for development such as Visual Studio and Azure DevOps, to services to test and deploy your applications such as Azure Functions.

Microsoft Visual Studio

Microsoft Visual Studio is an IDE (Integrated Development Environment) that enables the creation of software applications for multiple platforms. It allows developers to write code in multiple languages, including C++, C#, and JavaScript, and offers features such as IntelliSense, CodeLens, and Live Unit Testing. Additionally, Visual Studio offers integrations with Azure for quick deployment and management.

Azure DevOps

Azure DevOps enables continuous delivery for applications and helps teams maintain the highest possible code quality. It offers a range of services, from source control to Release Management, to provide full control over the software development lifecycle. AS such developers, can now develop, fix and collaborate on any issue, all with integration with Azure cloud.

Azure Functions

Azure Functions offers a way to run event-driven, serverless applications. It offers a way to run small pieces of code that automatically respond to real-time events, such as a new email being received or a new file appearing in storage. With Azure Functions, there's no infrastructure for developers to worry about, and it can be seamlessly integrated with other Azure services.

Conclusion

Microsoft Azure Development offers an array of benefits, including scalability, flexibility, and cost-effectiveness. It also offers a range of developer tools that improve workflow and enhance productivity. It's a feature-rich platform that enables developers to focus on innovation and development. With the help of Azure, businesses can streamline their processes, reduce time to market, and create reliable, secured applications. By creating applications on the Azure platform, you can benefit from easy, enjoyable, and hassle-free programming in the cloud.

Tuesday, February 8, 2022

Windows Service Error: The service did not respond to the start or control request in a timely fashion.

 Problem:

While deploying Windows Service built with .Net, you may have encountered this issue.

The service did not respond to the start or control request in a timely fashion.

Solution:

There is no description about the error appears anywhere, and you may have spent too much time in diagnosing this issue. Same happened to me, later I get it solved after searching a number of sites. Finally succeeded. So I decided to document the possible solutions:


1. DLLs Missing: 

Check if there is any dll file missing in the deployment. This is the most common mistake that the developers perform.

2. Service Logon Account: 

Check if the service running with Account has all the priviliges that are required to perform any operation. Open "View Local Services" then right click on your deployed service and take Properties. On "Log On" tab you will find the windows account which the service will be using to run. You can change the account credentials with privileged user to diagnose the problem.

3. Corrupt Installation or Corrupt files 

Files are corrupted required to run the service.

4. Network Related Issues:

There may be many other issues like Network configuration, Windows not updated,  required Version of .Net Framework is missing, Using Debug/Release build, Platform architecture mismatch, etc.


Hope you will get the solution from above solutions.

Happy Coding!

Saturday, December 19, 2020

How to Execute an Oracle stored procedure that returns LOB parameter using Entity Framework Core in .Net Core 3.1 with C#

Problem:

How to Execute an Oracle stored procedure that returns LOB parameter using Entity Framework Core in .Net Core with C#.

Solution:

Executing a simple stored procedure without LOB value is not a headache in Entity Framework, but if you try to execute a procedure that returns an LOB parameter, it may be a headache for you, because using any other method like FromSQLRaw, etc, procedure is executed but the Oracle connection closes before fetching LOB value. Here is the sample code to execute a stored procedure, lets say 'MY_PROC' that returns a CLOB parameter.


 private void ExecuteProcedure(IDbConnection dbConnection, Document d, DocumentDetail di, bool IsApproved, long? AgentKey, out string Status,out string Error)
        {
            try
            {

                Error = "";

                OracleParameter p1 = new OracleParameter("LOT_TYPE", OracleDbType.Varchar2, (d.Category == LotCategory.IMPORT) ? "BL" : "CRN", System.Data.ParameterDirection.Input );
                OracleParameter p2 = new OracleParameter("LOT_ID", OracleDbType.Varchar2, (d.Category == LotCategory.IMPORT) ? d.BLNo : d.CRNNo, System.Data.ParameterDirection.Input);
                OracleParameter p3 = new OracleParameter("ERRR", OracleDbType.Clob, System.Data.ParameterDirection.Output);
                OracleParameter p4 = new OracleParameter("STATUS", OracleDbType.Varchar2, System.Data.ParameterDirection.Output);
                OracleParameter p5 = new OracleParameter("DOC_ID", OracleDbType.Varchar2, di.BillingDocId,System.Data.ParameterDirection.Input);
                OracleParameter p6 = new OracleParameter("pIS_APPROVED", OracleDbType.Int16, (IsApproved)? 1:0, System.Data.ParameterDirection.Input);
                OracleParameter p7 = new OracleParameter("pVALIDITY", OracleDbType.Date, di.Validity, System.Data.ParameterDirection.Input);
                OracleParameter p8 = new OracleParameter("pAGENT_KEY", OracleDbType.Int64, AgentKey, System.Data.ParameterDirection.Input);
                OracleParameter p9 = new OracleParameter("pCREATOR", OracleDbType.Varchar2, HttpContext.ConnectedUser(), System.Data.ParameterDirection.Input);


                p3.Size = 5000;
                p4.Size = 50;


                var CON = _context.Database.GetDbConnection();
                {
                    con.Open();

                    var CMD = new OracleCommand();
                    CMD.Connection = (OracleConnection)CON;

                    CMD.CommandText = "MY_PROC";
                    CMD.CommandType = CommandType.StoredProcedure;
                    CMD.Parameters.Add(p1);
                    CMD.Parameters.Add(p2);
                    CMD.Parameters.Add(p3);
                    CMD.Parameters.Add(p4);
                    CMD.Parameters.Add(p5);
                    CMD.Parameters.Add(p6);
                    CMD.Parameters.Add(p7);
                    CMD.Parameters.Add(p8);
                    CMD.Parameters.Add(p9);
                    

                    CMD.ExecuteNonQuery();

                    Status = ((Oracle.ManagedDataAccess.Types.OracleString)p4.Value).Value;

                    if (!((Oracle.ManagedDataAccess.Types.OracleClob)p3.Value).IsNull)
                    {
                        Error = ((Oracle.ManagedDataAccess.Types.OracleClob)p3.Value).Value;
                    }

                     con.Close();
                };


            }
            catch (Exception x)
            {
                log.Error("Exception : " + x);
                Status = "Error";
                Error = x.Message;
            }
        }

Sunday, August 2, 2020

Problem

Image not saving / updating / uploading properly in Oracle Database using Entity Framework / EF Core in BLOB / CLOB field using Oracle.EntityFrameworkCore provider.


Solution

Oracle BLOB / CLOB has by-default restriction of 2000 bytes in Oracle.EntitiyFrameworkCore provider. Due to this reason it trims the larger image bytes array to 2000 bytes and store in database without giving any error. As a result image not appear properly when retrieved.

To overcome this issue, an attribute is provided by Entity Framework which increases its capability of accepting large sized images. MaxSize attribute is available in Data Annotations assembly which helps to solve this problem.

Hope your problem is solved. Happy Coding!!!

Tuesday, July 7, 2020

Crystal Reports for VS 2010 and .Net 4 framework : "Load Report Failed" error

Problem:
If you have recently upgraded your project and started using Crystal Reports for VS 2010 and .Net 4 framework in your project, you might seen this error randomly or continuously after generating some reports. 

Cause:
Unlike previous versions of Crystal Reports, Crystal Report Engine is not releasing memory after closing reports. 

Solution:
After getting tired of this error, I started diagnosing this issue. I monitored the memory usage and found that memory usage is getting increased even after closing down the reports. So I added some code to restore memory after closing. Here is the addition to my code that solved my problem:


            rpt.Close()
            rpt.Dispose()
            rpt = Nothing
            GC.Collect()


Hope it will solve your problem. Enjoy Coding!

Friday, March 6, 2020

The DataColumnMapping.SourceColumn is required to be unique. 'ColumnName' already exists in the collection.

Problem:

While configuring Table Adapter query in ADO.Net Dataset, you may have received this error:

 The DataColumnMapping.SourceColumn is required to be unique. 'Column' already exists in the collection


Solution:

Open the Dataset's xsd file with XML text editor. Search for the column name showing in the error. Manually remove the mapping column and then save the xml file.

Hopefully you will have no error from now on.

Friday, March 22, 2019

Add-Migration : The term 'Add-Migration' is not recognized as the name of a cmdlet...

Problem


Add-Migration : The term 'Add-Migration' is not recognized as the name of a cmdlet, function, script file, or operable program. Check the spelling of the name, or if a path was included, verify that the path is correct and try again.

Solution


  1. Open Menu Nuget Package Manager > Manage Nuget Packages for Solution
  2. If you are using EFCore then, Browse Package Microsoft.EntityFrameworkCore.Tools
  3. If you are using EntityFramework then, Browse Package Microsoft.EntityFramework.Tools
  4. Instal the Package
  5. Run the command again : add-migration initial
Hope your problem will be solved.


Tuesday, September 4, 2018

VirtualBox Error during Installation: Failed to retreive the preconfiguration file.

Problem:

While Installing Raspberry Pi over VirtualBox, you may encounter the following error:
Load debconf preconfiguration file.
The file needed for preconfiguration could not be retreived from....blah, blah, blah... The installation will proceed in non-automated mode.


Solution:

The installation file (Disk image) might be corrupt. Re-download the image from the official site, hopefully your problem will be resolved.

I would love to hear from you. Happy coding!

Wednesday, January 10, 2018

ORA-00604: error occurred at recursive SQL level 1 ORA-12705: Cannot access NLS data files or invalid environment specified 00604. 00000

Problem:


While connecting to an Oracle database with SQL Developer or JDeveloper, you might got this error:

Error:

An error was encountered performing the requested operation:
ORA-00604: error occurred at recursive SQL level 1
ORA-12705: Cannot access NLS data files or invalid environment specified 00604. 00000 -  "error occurred at recursive SQL level %s"

*Cause:    An error occurred while processing a recursive SQL statement            (a statement applying to internal dictionary tables).

*Action:   If the situation described in the next error on the stack            can be corrected, do so; otherwise contact Oracle Support. Vendor code 604

Solution:


The solution for this problem is simple, but I had to go through a number of websites to find its solution. So here it is:

1. If you are using SQL Developer:
Goto SQL Developer directory and there will be another SQL Developer directory, open it. Open bin folder, and you will find sqldeveloper.conf file in it.

Add 2 entries in sqldevelper.conf file:

AddVMOption -Duser.language=en
AddVMOption -Duser.region=US

Save the file and reopen SQL developer application, connect the database. Hope it will resolve your problem.

2. For JDeveloper, you have to perform the same procedure as described in (1), but in jdev.conf file.

Friday, May 12, 2017

Windows Update not working on newly installed Windows system.

Hi All,

You may experience this type of problem, where windows update was not working. You can follow below steps to ensure everything is correct and on its way.

1. First of all, check all Services related to Windows Update, like Windows Update Service, Cryptographic, BITS etc, are running.

2. Secondly, make sure your internet is properly working and you are able to browse windows update website in your browser. (http://www.update.microsoft.com/windowsupdate/)

3. Make sure you have installed all the latest drivers on your PC/Laptop, especially Operating System enhancements drivers, etc. This is an important step because it can prevent Windows Update from downloading updates.

4. Check the Software Distribution folder, whether it has the downloaded updates. The folder must be present in Windows directory.

5. If the downloaded updates are there, then check the Update History, available in Windows Update form.

6. Also check the WindowsUpdate.log file in Windows directory for errors. If there is an error in the log, try to search this error on the internet.

7. If log error shows error code : 8009017, then go to this microsoft page and reset Windows Update components by following the steps written there.

I hope this post will help you resolve the Windows Update problems. Must tell me the results by commenting on the blog.

Have a nice day.

God Bless.

Wednesday, February 15, 2017

Configure Office 365 Email on Android Mobile App


While Office 365 does not officially support open source mail clients, this article will provide you with settings that may help you set up your mail client to access Office 365 Exchange.
If your email client supports Exchange Web Services (EWS), use the following settings:
Field
Value
Email Address
(YOUR EMAIL ADDRESS)
Username
(YOUR EMAIL ADDRESS)
Domain
Leave Blank
Exchange Server
outlook.office365.com
Server Address
EWS Server
Outlook Web Access


If your email client does not support Exchange Web Services (EWS), you will need to configure your client to use traditional POP/IMAP + SMTP. Use the following settings:
User Settings:
Email Address
(YOUR EMAIL ADDRESS)
Username
(YOUR EMAIL ADDRESS)

Inbound Servers:
Type
Server Address
Port
POP Server (SSL)
outlook.office365.com
995
IMAP Server (SSL)
outlook.office365.com
993

Outbound Servers:
Type
Server Address
Port
SMTP Server (SSL)
smtp.office365.com
587


Thursday, August 4, 2016

Unexpected Error occurred in the Oracle Data Provider for .NET

While working with Oracle Data Provider with Visual studio you can get the following error:

The description for Event ID 0 from source devenv cannot be found. Either the component that raises this event is not installed on your local computer or the installation is corrupted. You can install or repair the component on the local computer.
If the event originated on another computer, the display information had to be saved with the event.
The following information was included with the event:
An unexpected error occurred in the Oracle Data Provider for .NET.  The data provider 'Oracle Data Provider for .NET' failed to load.  The {18147ff9-1f37-4425-865b-5066a33701de} service could not be found.
the message resource is present but the message is not found in the string/message table


Solution:


The simple solution to this problem is to check your "Server Explorer" in Visual Studio, remove all connections, and then restart Visual studio.

Hopefully your problem will be solved.

Thursday, April 7, 2016

iREPORT (Jasper Reports): Working with date and time

Date and time handling is slightly complex in all Programming Languages, since each area has different date/time format and each language has its own way of handling these objects. In iReport, many developers finds difficulty in formatting, treating date and time in day-to-day operations. I am listing here some of the useful tricks/methods to be used in iReport:


1. To get the current date and time:


new Date()


2. To get the current date only (Today in .Net):


 new Date( (new Date()).getYear(),(new Date()).getMonth(), (new Date()).getDate())


3. To check if a variable / date is null?:


$F{ThisDate} == null


4. In development, there arise some situations in which we have to use the current date if a date is null, then use a variable and assign it the following expression:


$F{ThisDate} == null ? new Date( (new Date()).getYear(),(new Date()).getMonth(), (new Date()).getDate()): $F{ThisDate}

5. To get the difference between two dates (including start and end date) in "No. of Days" unit:


(int) ((($F{OutTime}==null? (new Date( (new Date()).getYear(),(new Date()).getMonth(), (new Date()).getDate())).getTime(): (new Date($F{OutTime}.getYear(),$F{OutTime}.getMonth(), $F{OutTime}.getDate()).getTime())) - (new Date($F{InTime}.getYear(),$F{InTime}.getMonth(), $F{InTime}.getDate())).getTime())/ (1000 * 60 * 60 * 24))+1

where, getTime translates the date into milliseconds which allows to add subtract days.
To convert the result from milliseconds to days we divide the result by  (1000 * 60 * 60 * 24).
To include the start date in difference we added 1. In beginning of the expression, we used "(int)" to  cast the output to integer value.

I hope that the above information may be useful to you. Please feel free to comment, if you find any correction or you have a better solution.

Thanks!

Wednesday, March 25, 2015

Angular JS: Initializing a controller with a server side run-time value

This problem may look too much difficult for newbies to Angular JS. I was also stucked for some days, googled different websites, but no website could give me any working solution to my problem. Atlast I asked my senior and he helped me to solve this difficult problem in just few minutes.

Problem:

The problem was that I was using multiple partial views on my MVC view. I was trying to use Angular JS for just one of the partial view, whereas, all other views were using server side MVC controller. I had to pass a parameter from server side to my angular JS controller, so that it can get the data based on the parameter.

Solution:

First I tried ngInit approach, but it didn't worked. Every time data function was executing first and then initialize function was executing, as a result undefined parameter was passing to my controller function.

My senior advised me to initialize global variable in javascript on view with the value that I want to pass as a parameter, like this:

//script start

var globalValue = @MyValue;

//script end


then in the angular js controller use this global value like this:

$scope.GetFunctionData(globalValue).then( function() {
.
.
.
}


That's all!

Please write to me whether this solution worked for you. Stay blessed :)

Tuesday, November 18, 2014

Visual Studio Error: Unable to embed resource : Not enough memory to complete the operation

Error:

While building your project in VS 2010, you could get the following error:

Visual Studio Error: Unable to embed resource : Not enough memory to complete the operation

Solution:

This is a common issue in VS 2010, which have been discussed on a lot of forums, but I think nobody is assure about the solution. I get this error today, and took about half an hour to try to resolve it but I got no fruitful result. 

The main reason behind this problem is lack of memory and the project size expansion. Therefore, the Windows runs out of the memory. The quick and temporary solution is to select all files or at least the big-ones (specially the Crystal Reports) from your project using the solution explorer, check if their properties are set as Embedded Resource, change it to Content, then try to run the project. Don't change the files on which you are currently working on. This will prevent VS to embed unnecessary files. But remember, you will have to re-embed these files while building the final version like setup or publishing the project.

Wednesday, October 29, 2014

Nhibernate issue: {"in expected: from blah blah blah" }

Problem:


The exception is:

{"in expected: pc [select pc.parentCategory from ProductCategory pc]"}
[NHibernate.QueryException]: {"in expected: pc [select pc.parentCategory from ProductCategory pc]"}
Data: {System.Collections.ListDictionaryInternal}
HelpLink: null
InnerException: null
Message: "in expected: pc [select pc.parentCategory from ProductCategory pc]"
Source: "NHibernate"
StackTrace: " at NHibernate.Hql.FromParser.Token(String token, QueryTranslator q)\r\n at NHibernate.Hql.ClauseParser.Token(String token, QueryTranslator q)\r\n at NHibernate.Hql.PreprocessingParser.End(QueryTranslator q)\r\n at NHibernate.Hql.ParserHelper.Parse(IParser p, String text, String seperators, QueryTranslator q)\r\n at NHibernate.Hql.QueryTranslator.Compile()\r\n at NHibernate.Hql.QueryTranslator.Compile(ISessionFactoryImplementor factory, IDictionary replacements, Boolean scalar)\r\n at NHibernate.Impl.SessionFactoryImpl.GetQuery(String queryString, Boolean shallow)\r\n at NHibernate.Impl.SessionImpl.GetQueries(String query, Boolean scalar)\r\n at NHibernate.Impl.SessionImpl.Find(String query, QueryParameters parameters)\r\n at NHibernate.Impl.SessionImpl.Find(String query, Object[] values, IType[] types)\r\n at NHibernate.Impl.SessionImpl.Find(String query)\r\n at Castle.Facilities.NHibernateIntegration.SessionDelegate.Find(String query)\r\n at Cuyahoga.Modules.Ecommer
ce.CatalogueModule.GetSubCategories(Int32 node)\r\n at Cuyahoga.Modules.Ecommerce.Web.CatNav.Page_Load(Object sender, EventArgs e)"
TargetSite: {Void Token(System.String, NHibernate.Hql.QueryTranslator)}


Solution:

There could be several causes for this error, but the main reason behind this error is mapping.

1. Make sure your ClassName.hbm.xml file is set as "Embedded Resource".
2. Make sure table name, column names are correct and their types are correct.

Saturday, July 5, 2014

Creating Student Management System using .Net and Oracle

In Visual Studio .Net, creating a project is not difficult. It allows most of the things to drag and drop. It makes software development quite easy.

Today, we are discussing about how to create a Student Management System in Visual Studio .Net. For this purpose I have used Visual Studio 2008 and Oracle (any version).

First, we will have to create the database. We will use oracle for this purpose.

Below screenshot shows some tables that I have created in Oracle.


You can see, I have used some of the basic tables of this domain and also displayed the relationship among them. You can add or delete tables, fields in the tables, change the relationships as per your requirement.

To create these tables in Oracle we will have to write queries. You can also use some designer like Toad for this purpose. But I have used queries.

Here are the queries to generate these tables and their relationships:

CREATE TABLE COURSES
(
  COURSE_ID     NUMBER(10) PRIMARY KEY,
  TITLE         VARCHAR2(100)   NOT NULL,
  CREDIT_HOURS  NUMBER(5,2)
);

CREATE TABLE DEPARTMENT
(
  DEPARTMENT_ID  NUMBER(10)                    PRIMARY KEY,
  NAME           VARCHAR2(100 BYTE)            NOT NULL
);


CREATE TABLE EMPLOYEE
(
  EMPLOYEE_ID    NUMBER(10)                PRIMARY KEY,
  NAME           VARCHAR2(100)             NOT NULL,
  QUALIFICATION  VARCHAR2(50),
  SALARY         NUMBER(10,2),
  DESIGNATION    VARCHAR2(100),
  DEPARTMENT_ID  NUMBER(10),
CONSTRAINT FK_EMPLOYEE_R01
 FOREIGN KEY (DEPARTMENT_ID)
 REFERENCES DEPARTMENT (DEPARTMENT_ID)
);


CREATE TABLE FACULTY
(
  FACULTY_ID           NUMBER(10)      PRIMARY KEY,
  EMPLOYEE_ID          NUMBER(10)      NOT NULL,
  IS_VISITING_FACULTY  NUMBER(1)       DEFAULT 0    NOT NULL,
CONSTRAINT FK_FACULTY_R01
 FOREIGN KEY (EMPLOYEE_ID)
 REFERENCES EMPLOYEE (EMPLOYEE_ID)
);


CREATE TABLE FACULTY_COURSES
(
  FACULTY_ID  NUMBER(10),
  COURSE_ID   NUMBER(10),
CONSTRAINT FK_FACULTY_COURSES_R01
 FOREIGN KEY (FACULTY_ID)
 REFERENCES FACULTY (FACULTY_ID),
  CONSTRAINT FK_FACULTY_COURSES_R02
 FOREIGN KEY (COURSE_ID)
 REFERENCES COURSES (COURSE_ID)
);


CREATE TABLE EXAMS
(
  EXAM_ID        NUMBER(10)                     PRIMARY KEY,
  SEASON         VARCHAR2(10 BYTE)              NOT NULL,
  YEAR           NUMBER(4)                      NOT NULL,
  EXAM_TYPE      VARCHAR2(10 BYTE)              NOT NULL,
  PASSING_MARKS  NUMBER(10,2)
);


CREATE TABLE EXAM_RESULTS
(
  RESULT_ID       NUMBER(10)                    PRIMARY KEY,
  EXAM_ID         NUMBER(10)                    NOT NULL,
  FACULTY_ID      NUMBER(10)                    NOT NULL,
  COURSE_ID       NUMBER(10)                    NOT NULL,
  STUDENT_ID      NUMBER(10)                    NOT NULL,
  MARKS_OBTAINED  NUMBER(10)                    NOT NULL,
  GPA             NUMBER(4,2),
  STATUS          VARCHAR2(4 BYTE),
CONSTRAINT FK_EXAM_RESULTS_R01
 FOREIGN KEY (EXAM_ID)
 REFERENCES EXAMS (EXAM_ID),
  CONSTRAINT FK_EXAM_RESULTS_R02
 FOREIGN KEY (FACULTY_ID)
 REFERENCES FACULTY (FACULTY_ID),
  CONSTRAINT FK_EXAM_RESULTS_R03
 FOREIGN KEY (COURSE_ID)
 REFERENCES COURSES (COURSE_ID),
  CONSTRAINT FK_EXAM_RESULTS_R04
 FOREIGN KEY (STUDENT_ID)
 REFERENCES STUDENT (STUDENT_ID)
);


CREATE TABLE STAFF
(
  STAFF_ID         NUMBER(10)                   PRIMARY KEY,
  EMPLOYEE_ID      NUMBER(10)                   NOT NULL,
  JOB_DESCRIPTION  VARCHAR2(255 BYTE),
CONSTRAINT FK_STAFF_R01
 FOREIGN KEY (EMPLOYEE_ID)
 REFERENCES EMPLOYEE (EMPLOYEE_ID)
);

CREATE TABLE STUDENT
(
  STUDENT_ID  NUMBER(10)                        PRIMARY KEY,
  NAME        VARCHAR2(100 BYTE)                NOT NULL,
  ADDRESS     VARCHAR2(255 BYTE)                NOT NULL,
  SEMESTER    NUMBER(2)                         NOT NULL
);

CREATE TABLE STUDENT_COURSES
(
  STUDENT_ID  NUMBER(10)                        NOT NULL,
  COURSE_ID   NUMBER(10)                        NOT NULL,
CONSTRAINT FK_STUDENT_COURSES_R01
 FOREIGN KEY (STUDENT_ID)
 REFERENCES STUDENT (STUDENT_ID),
  CONSTRAINT FK_STUDENT_COURSES_R02
 FOREIGN KEY (COURSE_ID)
 REFERENCES COURSES (COURSE_ID)

);


First step is done.

Now we have to create dataset in Visual Studio. For this purpose, open Visual Studio, then Create C# or VB.Net project. Project must be Windows Form type.

Now add a dataset by right clicking on project and then 'Add New Item'. You can find Dataset in Data tab in the window that will be opened.

Right click on the dataset to Add Table, It will ask for your database connection. Create a new connection to your oracle database by providing it the required fields such as Host Name, password, etc. On clicking next button, All the tables of the database will appear. Select the required table, or select all the tables that we have created in the previous step. and click Finish.

Your dataset will be now ready. Compile the program to make sure there is no error. Now you can add database tables/fields to your form. Just open the form, open the Data Sources panel, drag one or more of the data table(s) appearing in it on to the form. You will see a Grid (table) will appear on the form. You can also drop fields instead of grid, by changing it to Details on Datasources panel before dropping.

Compile the program and enjoy :)

Hope you have understand the tutorial, you can feel free to ask any question.

Happy Coding :)
Popular Posts